PyMOL Moviemaking Tutorial
https://pymol.org/tutorials/moviemaking
Camera control with key frames |
Scene based Movie |
Independent object motions |
Timeline editing |
Trajectory movie |
Morphing |
Putting it all together
Moviemaking concept
PyMOL's concept of moviemaking is to store snapshot information with so called "key frames" on a movie storyboard, and to interpolate that information between the key frames, if applicable.
Storable information:
- view (camera)
- object positions
- states (trajectories)
- scenes (combining camera and style)
- commands
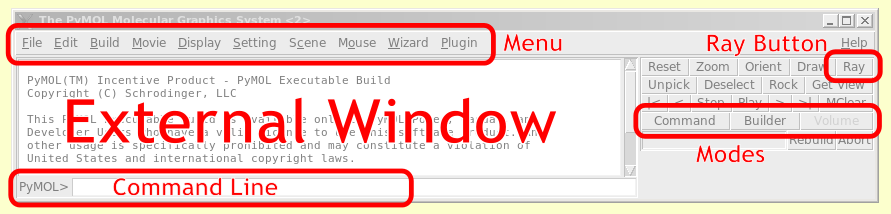
Interactive movie controls
PyMOL displays a movie panel with a frame slider at the bottom of the window. Right click on the panel to insert or delete key frames. The Motions Mouse Mode is used to store object specific key frames.
Relevant commands for scripting
Relevant settings
- movie_loop=on/off: connect the last and first frame when interpolating (Movie > Loop Frames)
- movie_auto_interpolate=on/off: immediately reinterpolate when adding a key frame (Movie > Auto Interpolate)
Camera control with key frames
In this exercise we create a movie which pans between different camera views. We need:
- A molecule
- frames ("time") on the movie panel
- at least two key frames with different camera orientation
Open PyMOL and follow these steps:
- Load a PDB file of your choice with File > Open > ..., or download one from the PDB by typing into the PyMOL command line:
fetch 1t46
- Add time to the movie with Movie > Append > 2 seconds, or type:
mset 1x60
The movie panel should appear at the bottom of the viewing window. Note that 2 seconds correspond to 60 frames, since the movie plays with 30 fps (frames per second).
- Store the first key frame by right-clicking on the movie panel > store, or type:
mview store
A blue button should appear at the current frame.
- Move or rotate the molecule (actually: the camera) with the mouse in the 3D window to get a different view. Store another key frame at (or near) frame 30 by right clicking on the middle of the movie panel, or type:
mview store, 30
- Press the Play button, or type:
mplay
The movie should play in a loop and the camera bounce between the two views.
Scene based Movie
This exercise is similar to the previous one, but we will add style information with scenes. Scenes store the camera view, object and atom colors, representations, and which objects are enabled.
- Fetch PDB 1t46 or load it from https://files.rcsb.org/download/1t46.pdb
- Show the protein in cartoon representation by clicking S > as > cartoon in the object menu panel, or by typing:
as cartoon
- Store a scene by clicking Scene > Append in the menu, or by typing:
scene 001, store
- There is a ligand, show it as sticks by clicking S > organic > sticks and zoom on the ligand with the mouse. Or type:
show sticks, organic
orient organic
- Store another scene by clicking Scene > Append in the menu, or by typing:
scene 002, store
- Setup a 2 seconds movie (see previous exercise)
- Now store the two scenes at two different key frames, by right clicking on the movie panel and selecting store with scene > .... Or type:
mview store,  1, scene=001
mview store, 30, scene=002
- Play the movie. The camera should bounce between ligand view and protein view, and the ligand should appear and disappear.
Independent object motions
PyMOL cannot only animate the camera view, but also the view on individual objects. This allows schematic presentation of events like ligand binding or dimer dissociation.
In this exercise we will do a simple ligand dissociation animation. We need two objects: One for the protein, and one for the ligand. Since both molecules will be in the same object after loading 1t46.pdb, we'll have to extract the ligand selection to a new object.
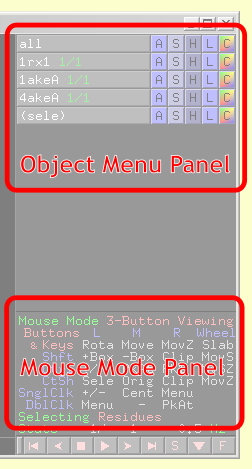
We can drag objects around by holding down SHIFT and using left (rotate), middle (x/y translate) and right (z translate) mouse buttons. By default, PyMOL will automatically store an object key frame when dragging objects (unless movie_auto_store=off). To prevent dragging the wrong object by accident, we can activate a single object for dragging by clicking M > drag in 3-Button Motions mouse mode.
Exercise instructions:
- Fetch PDB 1t46 or load it from https://files.rcsb.org/download/1t46.pdb
- Show it as A > preset > pretty or type:
as cartoon
show sticks, organic
- Right-click on the ligand and choose residue > extract object (will create obj01). Or type:
extract obj01, organic
- Setup a 2 seconds movie (see previous exercise)
- Switch to 3-Button Motions mouse mode (with right-click on the Mouse Mode panel in the bottom right). An extra M button should appear for every object in the object menu panel.
- Hold down the SHIFT key and drag the ligand out of the binding pocket, using the middle mouse button (usually the wheel). An object key frame should automatically be created.
- Go to frame 30, using the movie slider, or by typing:
frame 30
- Put the ligand (obj01) back into the binding pocket with M > reset. Or type:
reset object=obj01
Don't close PyMOL and continue with the next exercise.
Timeline editing
The speed of interpolations depends on the number of frames between two key frames. To change the speed after you have created key frames, you can move key frames or insert additional frames at any given frame.
The movie panel allows interactive inserting and deleting of frames, as well as moving and copying of key frames.
| Operation | Keyboard Modifier | Mouse Action | Command |
| Insert frames | CTRL+SHIFT | Left-Drag to the right | minsert |
| Delete frames | CTRL+SHIFT | Left-Drag to the left | mdelete |
| Move key frame | | Right-Drag key frame | mmove |
| Copy key frame | SHIFT | Right-Drag key frame | mcopy |
- Using the movie from the previous exercise, modify transition times by inserting or deleting frames, and by moving key frames.
Trajectory movie
In this exercise we create a movie from a trajectory, which is a multi-state object in PyMOL. Every state represents a different conformation of the same molecule.
There are two ways of mapping states to frames:
- using mset, e.g. mset 1-100 for a 100-state trajectory. This gives a global 1:1 state-to-frame mapping and is convenient since you set up the movie with a single command.
- using key frames. This is more flexible, it allows us to control the mapping per object and do non-1:1 mappings. Tip: Always use object key frames, never global (camera) key frames, to store states. Then camera/view control won't interfere with the state mapping.
We will set up our trajectory movie with key frames. Instructions:
- Load SampleTrajectory.pdb, which is a 500-model PDB file
- Create 500 movie frames (~16.7 seconds) with:
mset 1x500
- Go to frame 1 and store an object key frame for state 1, using M > store with state > 1, or type:
mview store, 1, state=1, object=SampleTrajectory
- Repeat the last step, but for frame 500 and state 500
Workaround for a known bug (otherwise molecule might disappear when playing the movie):
rebuild
You can play the movie now. It will look very jittery. Some extra trajectory preparation steps will make this look much more pleasant.
- Click A > align > states. This superposes all states on the first state and stops it from "floating around". You can also type:
intra_fit SampleTrajectory
- Filter out high frequency atom motions (with window averaging). Type:
smooth
Morphing
In this exercise we will generate a molecular morph between two conformations of adenylate kinase. We will get a multi-state trajectory-like object.
- Load 1akeA.pdb and 4akeA.pdb or fetch them:
fetch 1akeA
fetch 4akeA
- Align them by clicking (from the 4akeA entry in the object menu panel) A > align > to molecule > 1akeA, or type:
align 4akeA, 1akeA
- Create the morph by clicking (from the 1akeA entry) A > generate > morph > to molecule > 4akeA, or type:
morph morph01, 1akeA, 4akeA
You should now have a 30-state object called morph01. Don't close PyMOL but continue with the last exercise.
Putting it all together!
With the morph from the previous exercise we will create a movie which combines camera, object motions, and state transitions.
The 1akeA structure has a bound ligand. We want to animate how this ligand dissociates from the binding pocket while the protein changes conformation to the open state. For this movie we need two objects:
- the protein morph (30 states)
- the ligand (1 state)
Object preparation instructions:
- You should have the morph from the previous exercise. If not, load it from ake_morph.pdb. Show it as cartoon.
as cartoon
- We need to create a separate object for the ligand. This is easy if you show 1akeA with A > preset > pretty, then right click on the ligand (stick representation) and select residue > copy to object. This will create a new object called obj01. Or type:
create obj01, 1akeA and resn AP5
as sticks, obj01
Movie instructions:
- Setup a 4 seconds movie (see previous exercises)
- Switch to 3-Button Motions mouse mode
- For obj01 (the ligand), click M > store, or type:
mview store, 1, object=obj01
- For morph01 (the morph), click M > store with state > 1 (assuming state 1 is the closed conformation), or type:
mview store, 1, object=morph01, state=1
- Go to frame 60
- Store state 30 for morph01
- Displace the ligand by holding down the SHIFT button on the keyboard and dragging the ligand to the right using the middle mouse button. This will automatically create a key frame for obj01. Or type:
translate [20, 0, 0], object=obj01
- Copy the object key frames from frame 30 to the end of the movie, with SHIFT and right-mouse button dragging
- Add some camera key frames (choose your own views)
- Finally, export the movie with File > Save Movie As > MPEG..., or type:
movie.produce movie.mpg, quality=90
© 2015-2018 Schrödinger, Inc.