| PyMOL |
|
We will reproduce some images from Bono et al. 2010 and from Grünwald and Bono 2011.
In this exercise we export a ray-traced high-resolution PNG image from PyMOL. We use an existing script, only the PNG export is missing there.
Copy and paste the following script to a file named fig2A.pml.
# Fig. 2 A - Bono et al. 2010

# get structure
fetch 2x19, async=0

# representations
hide
show cartoon
show sticks, resn GTP
show spheres, name MG

# colors
color yellow, chain A
color green, chain B
color black, resn GTP or name MG

# background color
bg_color white

# camera view
set_view (\
   -0.932129204,    0.324005187,    0.161723644,\
   -0.014831773,    0.412064612,   -0.911032856,\
   -0.361820698,   -0.851599276,   -0.379291862,\
    0.000000000,    0.000000000, -270.411346436,\
  -47.325820923,   24.489761353,   17.685741425,\
  213.194366455,  327.628326416,  -20.000000000 )

# settings
set cartoon_fancy_helices

# render high resolution image
# TODO: ray trace 10x10 cm PNG image at 300 DPI
Use the png command to export a 10x10cm PNG image file at 300 DPI. See https://pymolwiki.org/index.php/Png#Example for how to use the command. |

|
|
Based on the script for figure 2 A from the previous exercise, create figure 2 B using the following data:
Set the view interactively in PyMOL using the mouse, then type into the PyMOL command line: get_view Replace the "set_view ..." part in the script with the output from "get_view". Finally, run the script again to generate a 10x10cm ray traced PNG image. |
|
|
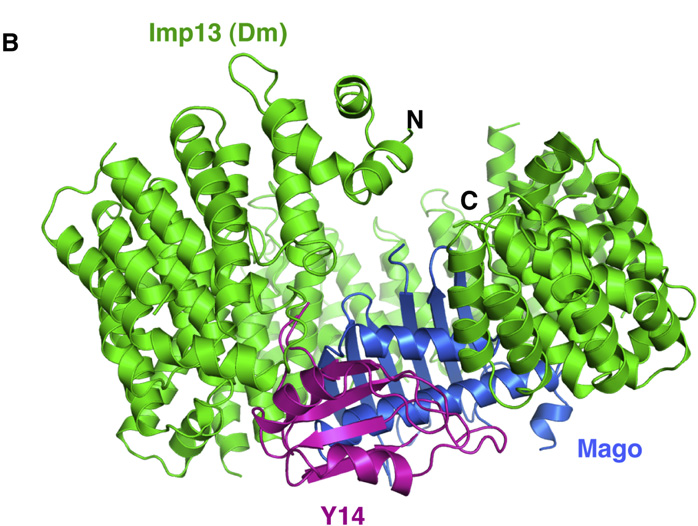
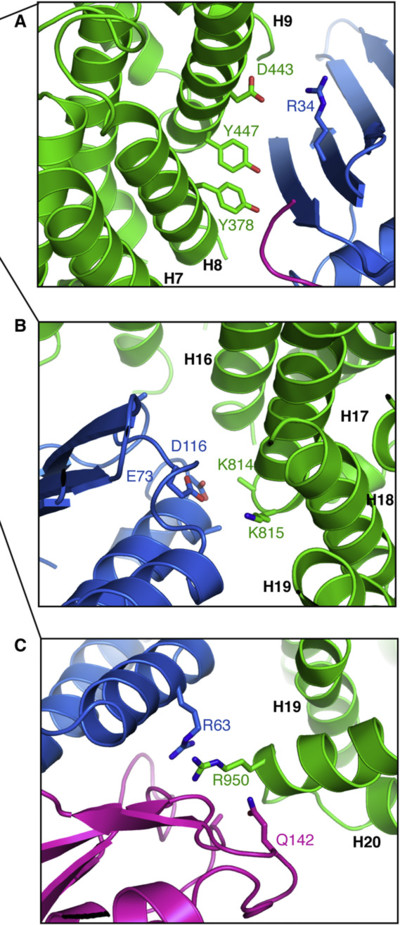
Based on the previous script (figure 2 B), create the sub-figures A, B and C from figure 4 in the same paper. Those are close-ups on inter-chain contacts, for which it shows stick representation of the involved residues. The following command will show sticks for residues D443 and Y447 of Importing 13, and color non-carbon atoms with a by-element coloring scheme: show sticks, chain F and resi 443+447 color atomic, not elem C Get all residue numbers from the paper figure and put them in your script. Optional: Such a figure will look better with cartoon_side_chain_helper enabled. Interactively set up the three views and for each view put a "set_view ..." followed by "png ..." in your script. Run the script to generate the three PNGs. |
|
|
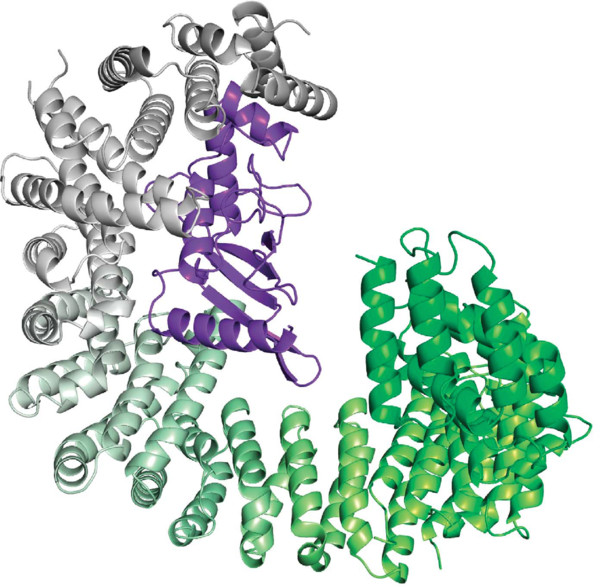
In Grünwald and Bono 2011, Importing 13 is colored with a gradient of different tones of green. It uses the spectrumany script which can be found on the PyMOLWiki. Download spectrumany.py from the PyMOLWiki and load it into PyMOL with run (load or import will also work). Hint: If you're lazy, you can also run a script directly from the web: run https://github.com/Pymol-Scripts/Pymol-script-repo/raw/master/spectrumany.py Reproduce figure 1 A with the following data:
|
|
|
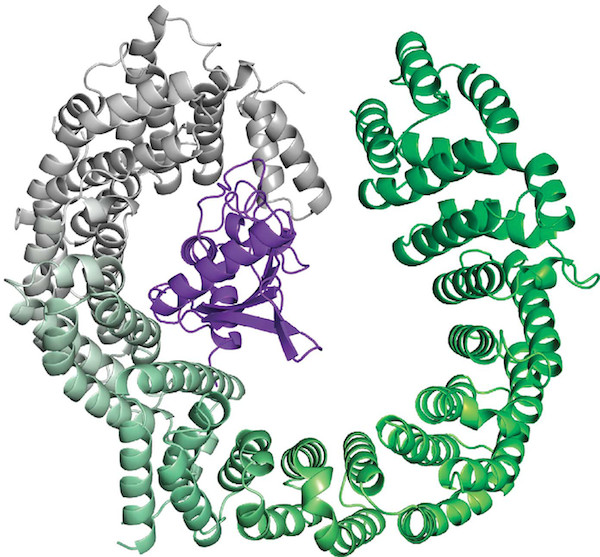
Based on figure 1 A, use the turn command to create figure 1 B, which is simply a 60 degree rotation around the x-axis. |
|
© 2017 Schrödinger, Inc.